15 minutes
Building an Efficient Network Flow Monitoring Tool with eBPF - Part 1

Introduction
In this post we will learn about the big picture and how to structure our eBPF program named flat to monitor network latency. We will mostly talk about preliminaries and write a very minimal eBPF program to get a feel of how things work together.
Make sure to check the previous posts to get up to speed with what we are about to build.
The Plan
In order to measure the latency of network traffic, we need to match the related ingress and egress flows and calculate the time it took to receive a response to a request.
Let’s say you make a connection from your PC with the IP address of 192.168.1.10 to example.com (93.184.216.34) on port 443. Then we have something like this:
| Packet | source IP | source port | destination IP | destination port |
|---|---|---|---|---|
Outgoing: SYN |
192.168.1.10 | 55431 | 93.184.216.34 | 443 |
Incoming: SYN/ACK |
93.184.216.34 | 443 | 192.168.1.10 | 55431 |
First off, we need a way to inspect the network packets. Then we hash the packets and take a note of the time we saw them. Lastly, if when there is a match (packets with the same hash), we calculate the time difference to have our flow latency.
Furthermore, both TCP, UDP as well as IPv4 and IPv6 traffic should be supported.
For TCP connections, we settle for
SYNandSYN/ACKpackets. UDP is connectionless and works very differently, nonetheless, I will demonstrate it for learning sake.
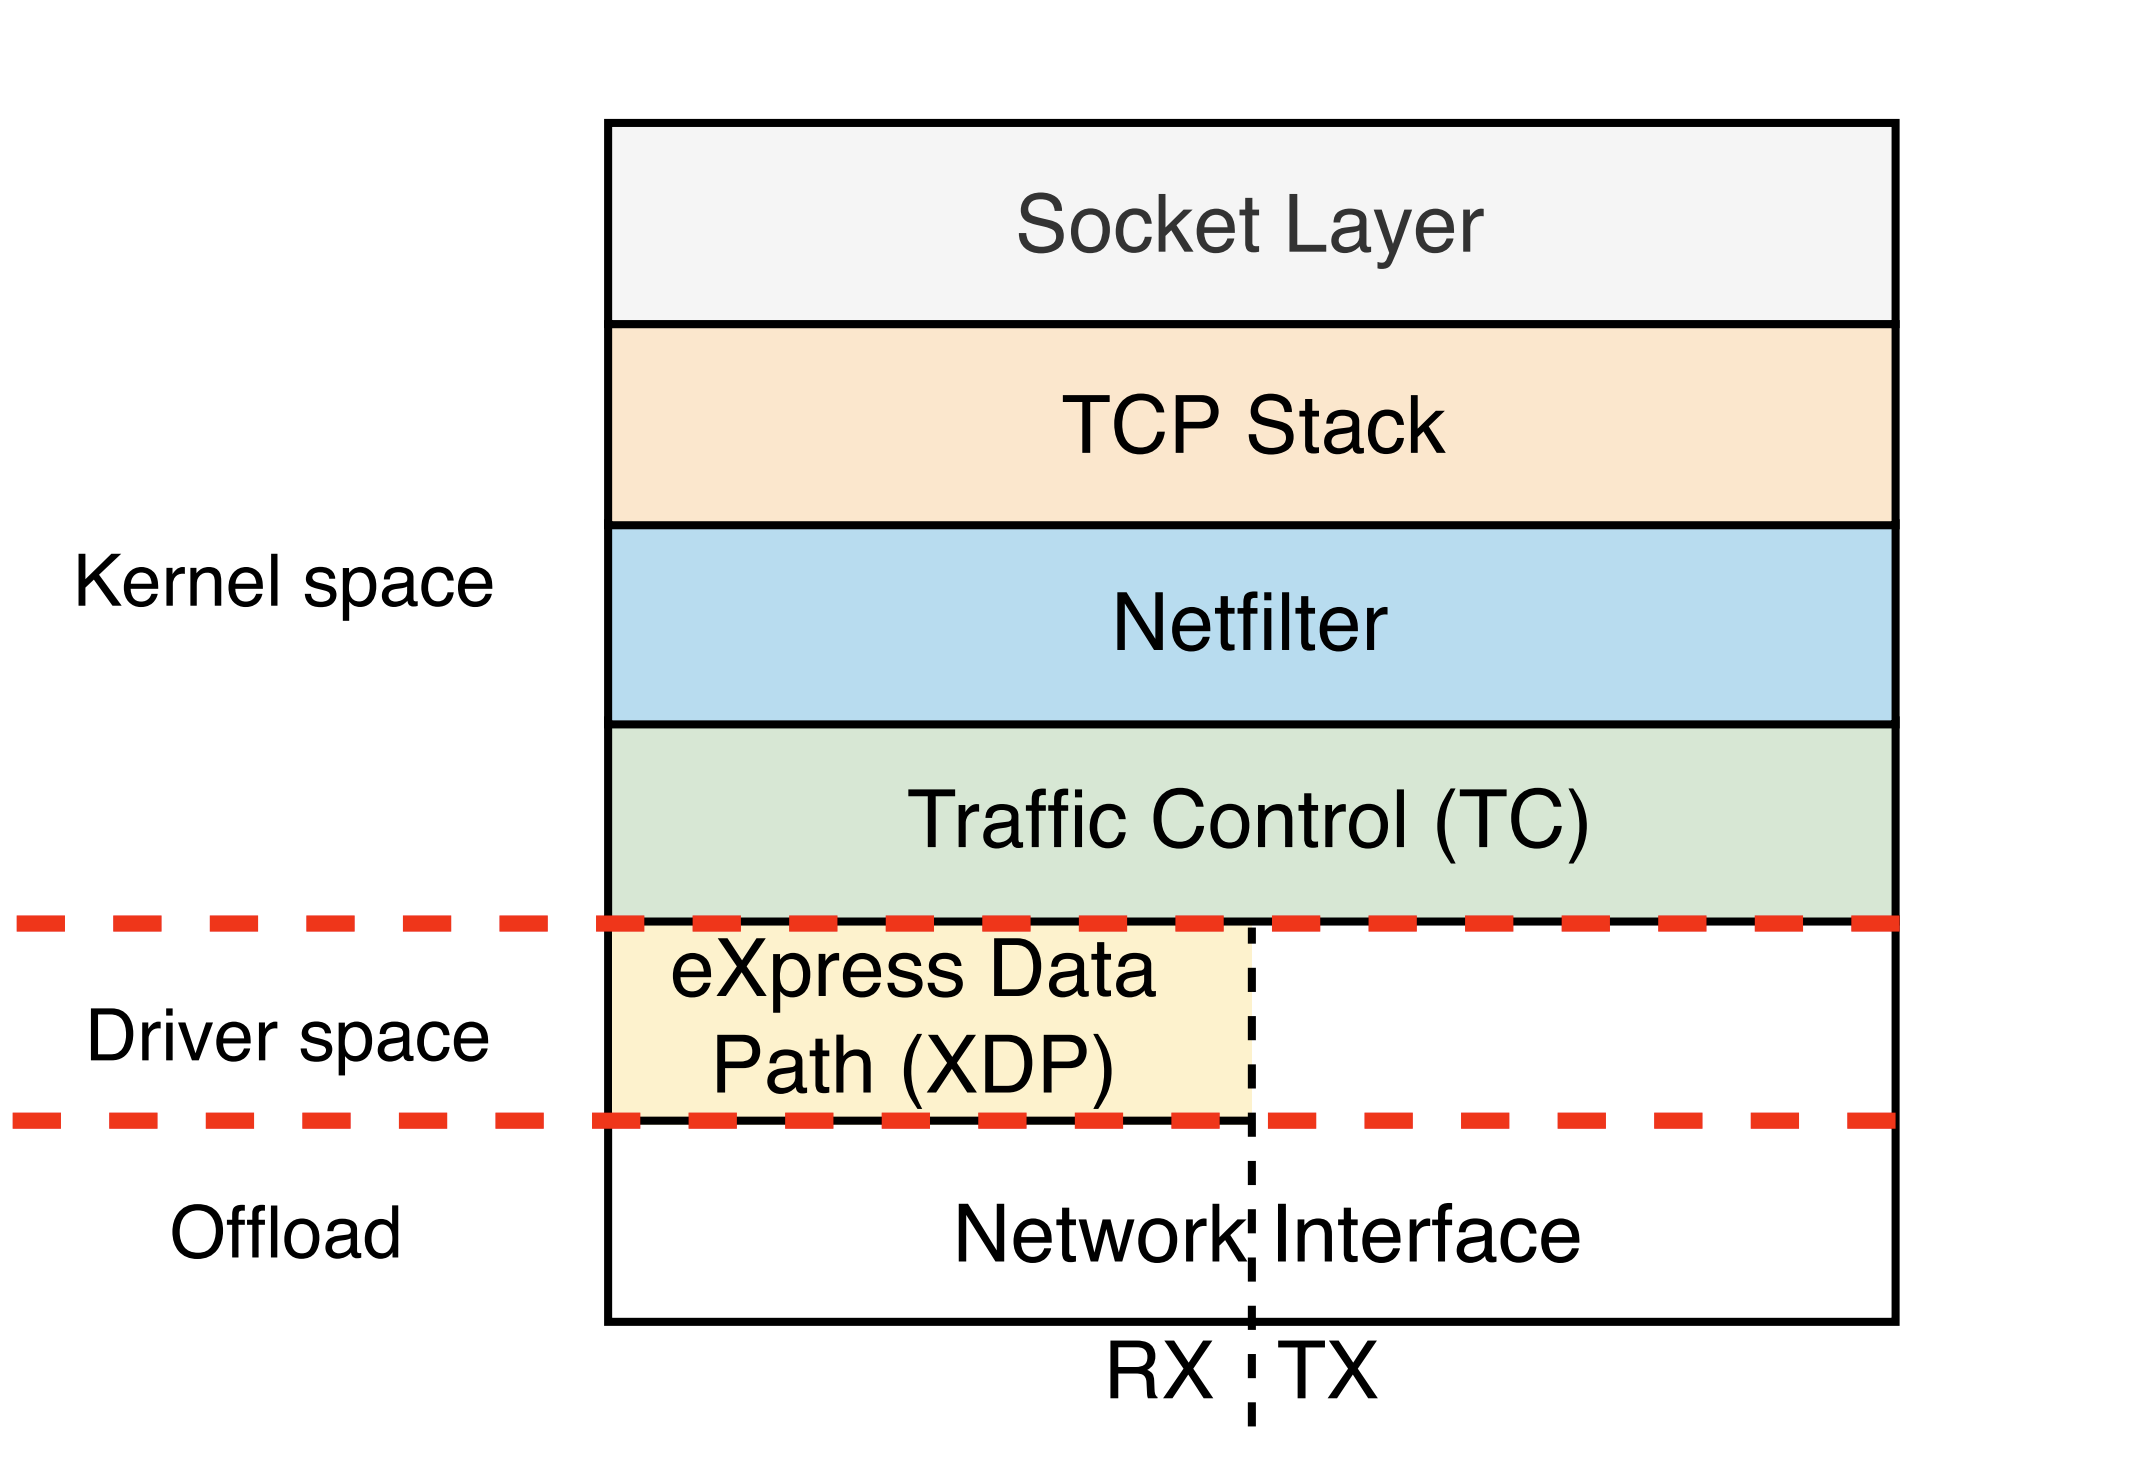
Inspecting The Flows
Reference 1
In order to inspect, intercept and influence the network traffic, there are a few hooks in the Linux networking stack in which we can attach to.
Two of the most widely used ones are:
- TC:
tcor Traffic Control is a subsystem in the Linux kernel that allows to view, control and shape the network traffic. Its main functionalities are traffic shaping, rate limiting, and packet filtering. - XDP:
XDPor eXpress Data Path is a specific eBPF program that runs on or close to the network device (NIC) in the Linux kernel. It operates at an early stage in the packet processing pipeline, before the packet reaches the kernel stack (bypasses all or most of the OS network stack depending on the mode). XDP enables extremely fast packet processing and can be used for mission critical tasks such as packet filtering, load balancing, and DDoS mitigation.
Since XDP can only be used for the ingress traffic and we want both ingress and egress flows, we will go with tc.
Read more about these hooks in this fantastic document from Cilium.
Hashing The Flows
By hashing the ingress and egress flows (five-tuple hash; which is widely used in many networking applications) and comparing them, we can determine if they belong to the same connection or not. For instance, hashing either of the the incoming or outgoing flows from the plan section, would result in 613cbe1ca8d3cc6a irrespective of the sequence in which the packets were received.
We will use the fnv hash algorithm which is a very efficient and simple hashing implementation for non-cryptographic purposes that is also available as part of the Go standard library.
eBPF Project Structure
At the time of this writing, Go does not provide an official standard way of structuring your projects but people usually use a convention like this.
Following the same convention, we will end up with this layout:
flat
├── bpf
│   └── flat.c
├── clsact
│   └── clsact.go
├── cmd
│   └── flat.go
└── internal
│   ├── flowtable
│   │   └── flowtable.go
│   ├── packet
│   │   ├── packet.go
│   │   └── packet_test.go
│   ├── probe
│   │   ├── probe.go
│   │   └── probe_test.go
│   └── timer
│       └── timer.go
├── go.mod
└── go.sum
Here is what these folders or directories hold:
- bpf: The eBPF C code.
- clsact: The code for qdisc or queueing discipline. Read more about
qdiscshere. - cmd: The main program code.
- internal: The code that only our program uses and other programs would not need.
- flowtable: The code that creates and manages our connection table.
- packet: The code that unmarshalls packets and calculates the latency of them.
- probe: The code that creates
qdisc,netfiltersand then prepares, compiles and loads the eBPF program into the kernel. - timer: The code that gives us the system time in nanoseconds since the OS boot.
You may clone the flat repository to get the same structure and code.
git clone https://github.com/pouriyajamshidi/flat
Our First eBPF Program
Finally, it is time to roll up our sleeves and write some eBPF code to make sure we have set up everything right.
We will begin with small test kernel space code by modifying the flat.c file located in the bpf directory.
The kernel Space Code
The kernel space code is where we define the hook point (tc in our case) we want to attach to and also gives us the ability to monitor, re-write or drop the packets.
There are a lot of bundled tests for eBPF programs with the kernel that we can use as a blueprint. For instance test_pkt_access that shows how to access a packet using the tc hook.
Let’s write a minimal program to test our setup first.
#include <stdint.h>
#include <stdlib.h>

#include <linux/bpf.h>

#include <bpf/bpf_helpers.h>

SEC("tc")
int flat(struct __sk_buff* skb) {
    bpf_printk("Got a Packet!\n");

    return 0;
}

char _license[] SEC("license") = "GPL";
We first import the libraries that our program requires.
Then, we define our program’s hook point using the SEC macro. The SEC("tc") attribute specifies that the eBPF program should be attached as a traffic control (TC) classifier and places part of the compiled eBPF object in a specific section within the Executable and Linkable Format or ELF file.
A
classifieris a program that analyzes and classifies network packets. It is designed to be attached to a specific hook point in the kernel’s networking stack, such as the traffic control (TC) subsystem.
Next, we define a function called flat which takes a pointer to the __sk_buff struct which is essentially a network packet’s metadata, as an argument. I’ll expand on __sk_buff struct here.
Inside the function, we leverage the bpf_printk helper function to print “Got a Packet!” to the kernel log whenever a packet is received.
Lastly, we include a GPL compatible license otherwise the eBPF program will not load into the kernel. The reason for that is some kernel functions required for our program to run are guarded by the GPL license.
Check out all the available licenses here.
The __sk_buff struct
The __sk_buff struct is a simplified and ABI-compatible view of the sk_buff struct in the kernel. It provides a subset of the fields from struct sk_buff that are relevant to eBPF programs. It is used to make eBPF programming easier and to maintain compatibility with potential changes to the struct sk_buff structure.
In simpler terms, you can think of the __sk_buff struct as a network packet or more concisely, information about a network packet.
Here is how the __sk_buff struct looks:
pouriya:~$ pahole __sk_buff
struct __sk_buff {
 __u32                      len;                  /*     0     4 */
 __u32                      pkt_type;             /*     4     4 */
 __u32                      mark;                 /*     8     4 */
 __u32                      queue_mapping;        /*    12     4 */
 __u32                      protocol;             /*    16     4 */
 __u32                      vlan_present;         /*    20     4 */
 __u32                      vlan_tci;             /*    24     4 */
 __u32                      vlan_proto;           /*    28     4 */
 __u32                      priority;             /*    32     4 */
 __u32                      ingress_ifindex;      /*    36     4 */
 __u32                      ifindex;              /*    40     4 */
 __u32                      tc_index;             /*    44     4 */
 __u32                      cb[5];                /*    48    20 */
 /* --- cacheline 1 boundary (64 bytes) was 4 bytes ago --- */
 __u32                      hash;                 /*    68     4 */
 __u32                      tc_classid;           /*    72     4 */
 __u32                      data;                 /*    76     4 */
 __u32                      data_end;             /*    80     4 */
 __u32                      napi_id;              /*    84     4 */
 __u32                      family;               /*    88     4 */
 __u32                      remote_ip4;           /*    92     4 */
 __u32                      local_ip4;            /*    96     4 */
 __u32                      remote_ip6[4];        /*   100    16 */
 __u32                      local_ip6[4];         /*   116    16 */
 /* --- cacheline 2 boundary (128 bytes) was 4 bytes ago --- */
 __u32                      remote_port;          /*   132     4 */
 __u32                      local_port;           /*   136     4 */
 __u32                      data_meta;            /*   140     4 */
 union {
  struct bpf_flow_keys * flow_keys;               /*   144     8 */
 };                                               /*   144     8 */
 __u64                      tstamp;               /*   152     8 */
 __u32                      wire_len;             /*   160     4 */
 __u32                      gso_segs;             /*   164     4 */
 union {
  struct bpf_sock *  sk;                          /*   168     8 */
 };                                               /*   168     8 */
 __u32                      gso_size;             /*   176     4 */

 /* size: 184, cachelines: 3, members: 32 */
 /* padding: 4 */
 /* last cacheline: 56 bytes */
};
The numbers in front of the
__sk_buffstruct fields specify theoffsetand thesizeof that field respectively.
Reading and writing to the __sk_buff struct will essentially reads and writes to the sk_buff struct. This conversion is transparently done by the eBPF verifier.
Running The Program
Before writing our user space program, I would like to demonstrate how to load the kernel space code into the kernel. There are two ways to do so:
- The Programmatic Way: Using a library like bpf2go that does the heavy lifting by compiling, loading and attaching our eBPF program to the desired hook point.
- The Manual Way: In this case, we compile, load and attach the program ourselves. This is particularly beneficial if there is no user space program to begin with and also helps to understand the programmatic way easier later on.
Let’s explore both methods.
The Programmatic Way
I described the programmatic way already. This is basically the user space code that we will write and explain here. But before doing so, it is important to fully grasp what we are going to do in a manual way first.
The Manual Way
Compiling the Program
First, make sure you are in the bpf folder. Then we will compile our eBPF code using the clang compiler:
clang -target bpf -Wall -O2 -c flat.c -o flat.o
Here is the breakdown of the command above:
target bpf: Tells clang to compile the code for abpftarget architecture to produce code that can run on the BPF virtual machine inside the Linux kernel.Wall: This option turns on all warning messages. This helps identify issues in the code that might not necessarily stop the compiler from compiling the code, but could lead to bugs when the program runs.O2: Tells the compiler to apply level 2 optimization to the code during the compilation process. This means it will try to improve the performance and/or reduce the size of the generated code, but at the expense of compilation time and possibly larger binary size.-c flat.c: Is the name of our input file containing the source code.-o flat.o: Is the name of our output orELFfile containing the compiled BPF bytecode.
If you have followed the steps so far, the compilation should succeed without errors and yield the flat.o file.
By the way, this is how the content of this ELF file looks like. Notice what the third index represents?
pouriya:~$ llvm-objdump -h flat.o

flat.o: file format ELF64-BPF

Sections:
Idx Name             Size     VMA              Type
  0                  00000000 0000000000000000
  1 .strtab          000000b9 0000000000000000
  2 .text            00000000 0000000000000000 TEXT
  3 tc               00000078 0000000000000000 TEXT
  4 .rodata.str1.1   0000000f 0000000000000000 DATA
  5 license          00000004 0000000000000000 DATA
  6 .debug_str       000002fb 0000000000000000
  7 .debug_abbrev    00000122 0000000000000000
  8 .debug_info      000004d6 0000000000000000
  9 .rel.debug_info  000005b0 0000000000000000
 10 .debug_ranges    00000030 0000000000000000
 11 .BTF             0000050d 0000000000000000
 12 .rel.BTF         00000010 0000000000000000
 13 .BTF.ext         00000090 0000000000000000
 14 .rel.BTF.ext     00000060 0000000000000000
 15 .debug_frame     00000028 0000000000000000
 16 .rel.debug_frame 00000020 0000000000000000
 17 .debug_line      000000bd 0000000000000000
 18 .rel.debug_line  00000010 0000000000000000
 19 .llvm_addrsig    00000002 0000000000000000
 20 .symtab          00000870 0000000000000000
Adding qdiscs
Next, we need to create a special clsact queueing discipline or qdisc that provides ingress and egress hooks to attach the BPF classifier and actions to apply certain traffic control or filtering policies to the data being sent or received over an interface.
It is worthwhile to mention that the
clsactqdisc does not do any actual queueing. It is mainly used for classification.
For the sake of demonstration, I chose the loopback (lo) interface:
sudo tc qdisc add dev lo clsact
Then, we apply a BPF filter on the loopback interface’s ingress and egress traffic. This filter can identify packets and perform direct actions depending on the criteria we define.
sudo tc filter add dev lo ingress bpf direct-action obj flat.o sec tc
sudo tc filter add dev lo egress bpf direct-action obj flat.o sec tc
We have gone through most of what the commands above do but it might be beneficial to clarify a bit more.
tc filter add dev lo: Adds a filter to the loopback interface.ingressandegress: Determine the traffic direction hook.bpf direct-actionorbpf da: Allowsbpfclassifier to both identify and perform an action on a packet (likeTC_ACT_SHOTfor dropping orTC_ACT_OKfor passing the packet, etc) without calling into externaltcactions.obj flat.o: Specifies the eBPF bytecode to be loaded as the filter.sec tc: Specifies the section of the eBPF program to be loaded. In this case, thetcsection; SEC(“tc”) inflat.cfile.
At this point, we should be able to generate some traffic to our loopback interface and see the logs.
In order to remove the qdisc and its filters use
sudo tc qdisc del dev lo clsact.
Displaying The Logs
There are three ways to view the trace logs:
sudo bpftool prog trace logsudo tc exec bpf dbgsudo cat /sys/kernel/debug/tracing/trace_pipe
The
bpf_printkandbpf_trace_printkhelper functions always write to/sys/kernel/debug/tracing/trace_pipe.
Here is the output of sudo bpftool prog trace log when I run ping 127.0.0.1:
ping-277466  [000] d.s1. 184275.151823: bpf_trace_printk: Got a packet!
ping-277466  [000] d.s1. 184275.151849: bpf_trace_printk: Got a packet!
ping-277466  [000] d.s1. 184276.170139: bpf_trace_printk: Got a packet!
ping-277466  [000] d.s1. 184276.170164: bpf_trace_printk: Got a packet!
ping-277466: The process that triggered the hook and its PID.[000]: The CPU number that is running the eBPF program.d.s1.: The trace event’s flags (dmeans kernel space) and preempt-count (s1). The flags contain information about hard or soft interrupt flags, and whether the event occurred in user or kernel space.184276.1xxxxx: The timestamp in seconds since the system boot.bpf_trace_printk: Got a packet!: The function that was called and the message we specified inflat.cfile.
The User Space Code
The bpf2go is responsible to compile the kernel space code into eBPF bytecode and the rest of our user space code will load it into the kernel and attaches it to various hook points. It also provides a communication channel between the user and kernel space programs using maps.
The Code
This is the code that goes into the probe.go file:
package probe

//go:generate go run github.com/cilium/ebpf/cmd/bpf2go probe ../../bpf/flat.c - -O2  -Wall -Werror -Wno-address-of-packed-member

func loadObjects() (*probeObjects, error) {
 objs := probeObjects{}

 if err := loadProbeObjects(&objs, nil); err != nil {
  return nil, err
 }

 return &objs, nil
}
Let’s break it down.
- The
package probedefines the package this code belongs to. - The
//go:generatetag or directive: Is a special comment in Go. When you rungo generate, it executes the script or command in that comment.go run github.com/cilium/ebpf/cmd/bpf2go: Compiles the C source file into eBPF bytecode and emits two Go files containing helper functions to load and interact with eBPF programs and two files that contain the compiled eBPF bytecode.probe ../../bpf/flat.c: Specifies the prefix of the output Go file (probe) and the path to the input C file../../bpf/flat.c.-O2 -Wall -Werror -Wno-address-of-packed-member: These are C compiler flags passed to clang.-O2is the optimization level,-Walland-Werrorenable all warnings and treat them as errors, and-Wno-address-of-packed-memberdisables the warning about taking the address of a packed member of astructorunion.
- The
loadObjectsfunction is responsible for loading the compiled eBPF program.
The loadObjects creates an instance of probeObjects which holds the eBPF program and its associated data. It then calls loadProbeObjects, passing in the address of probeObjects and nil as parameters to load the eBPF program into the kernel.
At the root of the flat directory, run go generate ./... to compile the C code and generate Go bindings for our eBPF program. go generate will create two Go and two ELF files:
probe_bpfel.goandprobe_bpfeb.go: Contain bindings of the compiled BPF for little and big endian systems, respectively, that are to be used in our user space code.probe_bpfel.oandprobe_bpfeb.o: Contain the compiled BPF bytecode for little and big endian systems, respectively.
The Test
We can write a test case for probe.go to verify that everything is working as expected. Populate the probe_test.go file with:
package probe

import (
 "testing"

 "github.com/stretchr/testify/require"
)

func TestProbeLoad(t *testing.T) {
 _, err := loadObjects()

 require.NoError(t, err)
}

func TestPacket(t *testing.T) {
 prbe := probe{}
 err := prbe.loadObjects()

 require.NoError(t, err)

 in := []byte{1, 2, 3, 4, 5, 6, 7, 8, 9, 0, 1, 2, 3, 4, 5}

 ret, out, err := prbe.bpfObjects.Flat.Test(in)

 require.NoError(t, err)
 require.Equal(t, uint32(0), ret)
 require.Equal(t, in, out)
}
Let’s break it down.
The TestProbeLoad loads the eBPF program into the kernel and makes sure there are no errors.
Then we go a step further in TestPacket by loading the eBPF program into the kernel and then execute it by giving it 15 bytes of random data. Next, we check that there were no errors by checking:
require.Equal(t, uint32(0), ret): The return code of our program should be 0.require.Equal(t, in, out): The input data was not altered.
The kernel expects at least 14 bytes input for an
ethernet headerforXDPandSKBprograms. That is the reason for providing 15 bytes using theinvariable.
Running The Test
In one terminal run sudo bpftool prog trace log to view the kernel trace log and in another, while at the root of the flat directory, run sudo -E go test ./... to trigger all the tests to run.
sudo is required since this program requires elevated privileges. The
-Eflag will pass the current user’s environment variables to the super user.
This will give us this output:
<...>-32759 [006] d...1 30096.872189: bpf_trace_printk: Got a Packet!
Perfect. Our program works both manually and programmatically now. This is a good time to stop and reflect on what we’ve learned so far.
Conclusion
In this post we learned how to write a minimal eBPF code, load and attach them to tc hook point and view the logs. In the next posts, we will expand on what we have learnt thus far and further improve flat.
Thanks for reading!
References
Footnotes
-
Link to the Linux kernel Network Stack paper. ↩︎
eBPF BPF TCP Network Linux Kernel Programming Tutorial Flow monitoring flat
3103 Words
2023-07-30 11:34