19 minutes
Tcpreplay - Modify And Replay Packet Captures Back Into The Network

What We Will Learn
In this article, we will learn how to:
- Generate random syslog messages using the logger utility
- Modify packet captures using Tcprewrite
- Replay packets (pcap/pcapng files) in a controlled way and locally using Tcpreplay with the help of
tcandnetwork namespaceson Linux machines
These will be the main takeaways from this article. Although there are some more details, which you can explore further.
I have tested these steps on four different machines with various differences (Linux kernel versions, WSL, LAN, and WLAN interfaces, etc.) and provided solutions to potential issues that you might encounter throughout this article.
The Scenario
Recently, I have been writing a syslog proxy in Nim to take the millions of syslog messages we receive per day to the next level by:
- Filtering the ones we don’t care about based on their message content and not the log level, this saves a lot of database operations, disk space, and weeds out unimportant logs
- Message content alterations such as:
- changing log levels based on some conditions. For instance, the severity of an interface flap on a core switch should be seen as critical not a regular notice
- name resolution by replacing a device IP with its name so that we have a nice layer of translation baked into our monitoring system. This way you don’t need to lookup or memorize thousands of IP addresses to see what comes from where
- Propagation, send syslogs to one destination, let it filter, process, and then forward to other syslog servers, so less load on network devices and also bypass potential vendor limitations
Here is a diagram to give you a better clarity:
For this to work, I needed real raw syslog messages from our network infrastructure to flow through my machine so that I could observe, operate, and experiment on them.
Naturally, my machine cannot be configured as a real syslog target since I move a lot, and on top of that, these gymnastics are not something that you would want in your network.
However, you can run a packet capture at some point in your network and store a bunch of these syslog messages.
The question is, how can you receive these packets at a later time and perhaps in another network as if it were live network traffic coming through your machine?
This is where Tcpreplay comes into play.
What is Tcpreplay
Tcpreplay is a fantastic suite of tools that allows you to edit, randomize, or remove data such as IP, port, and MAC addresses inside your pcap/pcapng files, as well as providing the ability to actually play them back into the network as the events had occurred as if you are traveling back in time. You can even increase or decrease the speed at which the packets should be fired.
Tcpreplay is an astonishingly powerful suite and is packed with much more functionality that will be show-cased here. I encourage you to go through their documents and experiment on your own.
Tcpreplay brings so many benefits like:
- Analyzing network behavior in various conditions, say different speeds or connection quality
- Testing security appliances such as firewalls or IPS/IDS
- Troubleshooting or experimenting with applications
- or in our case, replaying syslog messages and operating on them
Sounds intriguing, isn’t it?
Let’s start off by installing it.
Tcpreplay Installation
It is worthwhile to mention that installing the Tcpreplay suite brings these utilities along which you can explore separately:
- tcprewrite: Rewrite the packets in a pcap file
- tcpreplay: Replay network traffic stored in pcap files
- tcpreplay-edit: Edit and replay network traffic stored in pcap files on the fly
- tcpliveplay: Replay network traffic stored in a pcap file on live networks using new TCP connections
- tcpprep: Create a tcpreplay cache file from a pcap file
- tcpbridge: Bridge network traffic across two interfaces
- tcppcapinfo: pcap file dissector for debugging broken pcap files
The Tcpreplay suite can be installed in two ways:
- The easy way, using your distro’s package repository
- or the better way, compiling from source
The choice is yours.
The Easy Way
Tcpreplay is available in various distros package repositories. I am rocking an Ubuntu derivative machine and can simply install it like:
sudo apt update
sudo apt install tcpreplay
On my machine, it installs version 4.3.2 which is released in 2018, making it six years old at the time of this writing.
I don’t know about you, but I prefer using the latest version of these tools, because there are bug fixes and new features, leading to less head-scratchers.
The Better Way
Compiling from source is a fun and good way to keep up-to-date with the software you use and also teaches you a thing or two about Linux systems.
libpcapandbuild-essentialare required for a successful installation. Install them likesudo apt install libpcap-dev build-essentialbefore continuing.
Looking at the official source, at the time of this writing the latest version of Tcpreplay is 4.5.1, so we will proceed with that:
wget https://github.com/appneta/tcpreplay/releases/download/v4.5.1/tcpreplay-4.5.1.tar.gz
Uncompress it:
tar zxvf tcpreplay-4.5.1.tar.gz
Go inside the directory:
cd tcpreplay-4.5.1/
Install it:
./configure
make
sudo make install
Please note that we are not compiling with netmap and XDP capabilities to keep this article short and simple.
Confirm that it was installed properly:
TheGrayNode.io> tcpreplay --version
Warning: May need to run as root to get access to all network interfaces.
tcpreplay version: 4.5.1 (build git:v4.5.1)
Copyright 2013-2024 by Fred Klassen <tcpreplay at appneta dot com> - AppNeta
Copyright 2000-2012 by Aaron Turner <aturner at synfin dot net>
The entire Tcpreplay Suite is licensed under the GPLv3
Cache file supported: 04
Not compiled with libdnet.
Compiled against libpcap: 1.10.1
64 bit packet counters: enabled
Verbose printing via tcpdump: enabled
Packet editing: disabled
Fragroute engine: disabled
Injection method: PF_PACKET send()
Not compiled with netmap
Not compiled with AF_XDP
Good stuff!
We can roll-up our sleeves and play with some packets now.
Generating syslog Messages (Optional Step)
If you already have some packet captures or just want to read without getting hands-on, feel free to skip this section. This is just to show how to generate custom syslog messages and for the remainder of this article, we will use this packet capture file.
What if you don’t have any syslog packet captures? Well, fret not. We can generate some on demand at the comfort of our own machine using the logger tool.
logger is a pre-installed utility on unix-like machines that can produce various syslog types with different severity levels.
As a refresher, here are syslog’s severity levels:
- 0: Emergency
- 1: Alert
- 2: Critical
- 3: Error
- 4: Warning
- 5: Notice
- 6: Informational
- 7: Debug
The first thing to do is to capture packets using Wireshark or for the CLI junkies, tcpdump or tshark:
sudo tcpdump -ni lo port 514 -w syslog.pcapng
# or
sudo tshark -i lo -f "port 514" -w syslog.pcapng
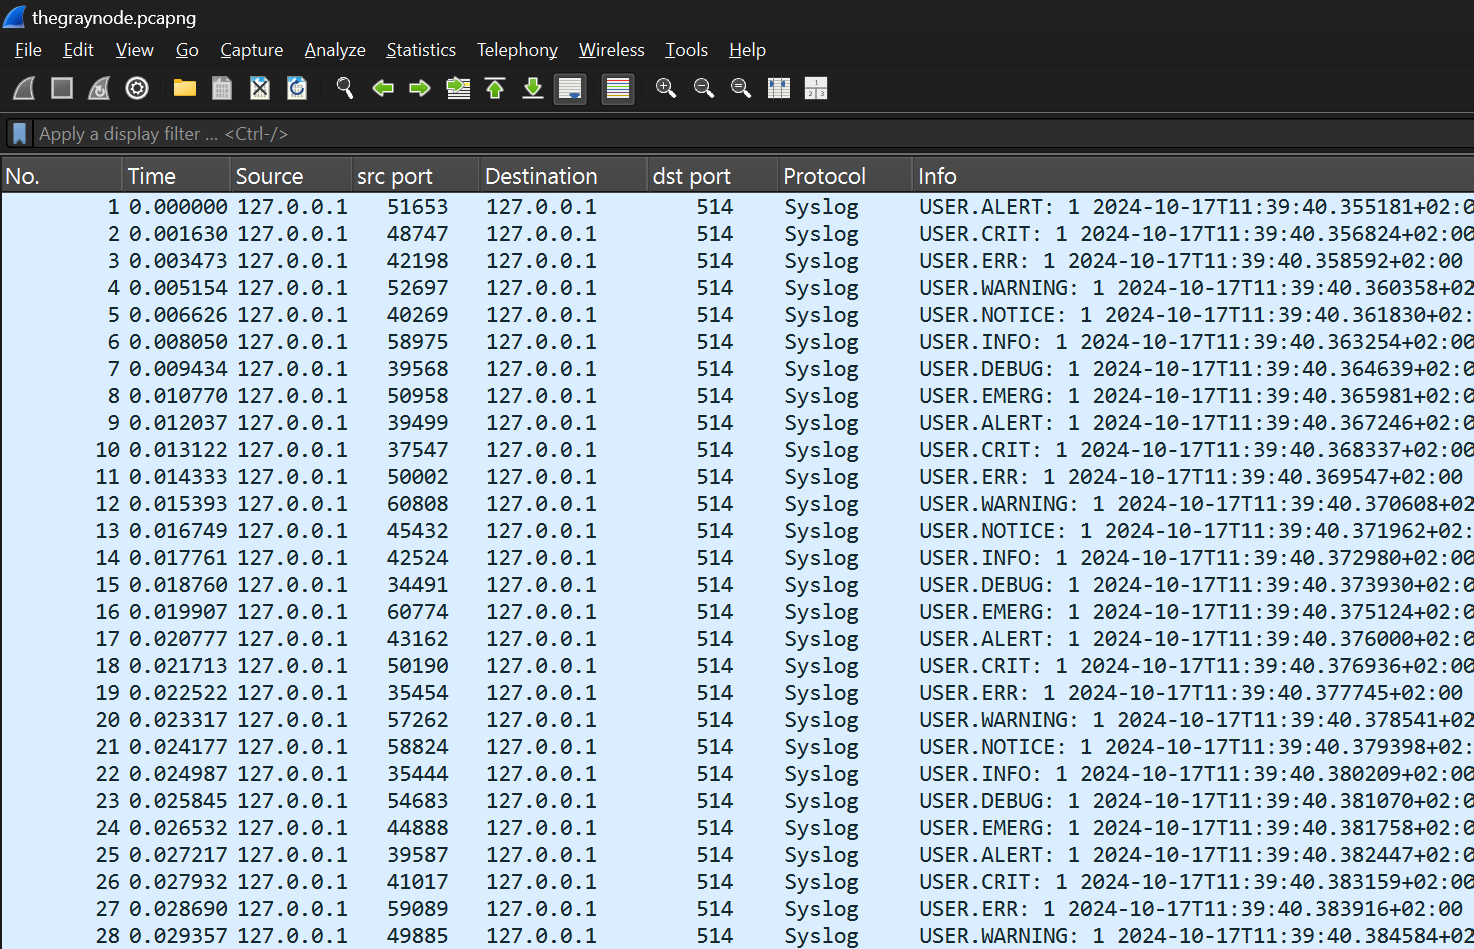
Now, with the help of a Bash one-liner, we can generate a bunch of syslog messages with somewhat random log levels:
for i in {1..50}; do
  logger -n 127.0.0.1 \
    -P 514 \
    -t thegraynode.io \
    -p user.$(($i%8)) \
    "Line protocol on Interface HundredGigE1/0/$(($i%8)), changed state to down";
done
This one-liner, sends 50 syslog messages to the loopback IP using syslog’s default port, 514, with the tag/app name of thegraynode.io (if you don’t specify the tag, the current username will be used), a relatively random severity on user-level facility thanks to the modulo (%) operator, and finally, a familiar message at the end.
Opening the packet capture should yield something similar to:
As a bonus point, if you would like to see the messages reaching a destination as they are generated, you can run nc on another terminal and see syslog packets being received:
sudo nc -nukl 127.0.0.1 514
Also, for brevity, we can insert a blank line in between syslogs so that reading them through nc would be easier:
for i in {1..50}; do
  logger -n 127.0.0.1 \
    -P 514 \
    -t thegraynode.io \
    -p user.$(($i%8)) \
    "Line protocol on Interface HundredGigE1/0/$(($i%8)), changed state to down";
  echo "" > /dev/udp/127.0.0.1/514;
done
Keep in mind that capturing packets while echoing this blank line will result in a pretty bizarre-looking pcap file. But if that’s your thing, go for it.
Modifying Packet Captures
In order to play back the packets into the network, we first need to modify a bunch of things to make this a possibility:
- Source and destination MAC addresses
- Source and destination IP addresses and the Internet layer (IP) checksum
- Source and destination ports (if necessary) and the Transport layer (TCP/UDP) checksum
- Optional: VLAN tag addition, deletion or modification (if present in the original capture or needed in the target network)
The source MAC, IP, and port can remain the same in most scenarios. We usually care about the destination addresses to match our new environment unless you are dealing with Martian packets and Reverse Path Filtering causing packet drops. The problem that I faced on one machine and had to troubleshoot with pwru which utilizes eBPF
These modifications should reflect the target network details. For instance:
If the original destination IP and MAC address were 10.10.10.10 at 00:00:00:00:00:01 and the system or NIC we are sending this traffic to is 172.16.10.10 at 00:00:00:00:00:02, we need to alter the destination MAC, IP and the internet layer checksum to guarantee a successful delivery.
In case we are also changing the port numbers, then we should modify the transport layer checksum as well to ensure packets won’t get dropped by the kernel’s TCP/IP stack or some NICs with offloading capabilities.
Note: In the following examples, I use arbitrary pcap file names as well as MAC and IP addresses. Make sure to substitute them according to your setup.
Alright, let’s start with a worthwhile piece of information and then see how it is done.
Cooked vs Normal Packet Captures
Packet captures or pcap/pcapng files can be modified using the Tcprewrite utility of the Tcpreplay suite, enabling them to be replayed over the wire.
One crucial piece of information before going any further is that if you have captured packets using the any interface filter (tcpdump -i any …), your pcap files will be in SLL2 or cooked-mode!
This means a pseudo or fake link-layer header is used instead of the normal Ethernet header (assuming that you are dealing with Ethernet), and tcpreplay will not be able to modify the capture file.
The reason a fake link-layer header is used, as described here and in summary, is:
- Not all interfaces on a machine necessarily have the same link-layer type. e.g. PPP vs Ethernet, while capture filters need the same link-layer type to work.
- The SOCK_DGRAM socket is used to capture packets instead of the usual SOCK_RAW socket which does not supply the packet’s link-layer header data.
The images below from Wireshark will put the difference between a cooked and a normal packet capture into perspective.
A cooked packet capture (using tcpdump -i any):

A normal packet capture (using tcpdump -i lo):

In case your packet capture is cooked, continue to this section; otherwise, skip to this one.
Editing Cooked (SLL2) Packet Captures
In this scenario, we should uncook, or in other words, remove the fake link-layer headers and craft new Ethernet headers using Tcprewrite:
tcprewrite --dlt=enet \
   --enet-smac=11:22:33:44:55:66 \
   --enet-dmac=66:55:44:33:22:11 \
   -i cooked.pcapng \
   -o uncooked.pcapng
Here, we deleted the pseudo link-layer data using --dlt=enet and created a new link-layer header with our arbitrary source and destination MAC addresses using --enet-smac and --enet-dmac respectively. The -i and -o flags specify the input and output pcap file names.
Now that we have a normal packet capture and since the remaining steps are the same, we can jump to the second step in the next section.
Editing Normal Packet Captures
Altering the source and destination MAC addresses is pretty straight-forward:
tcprewrite \
   --enet-smac=11:22:33:44:55:66 \
   --enet-dmac=66:55:44:33:22:11 \
   -i normal.pcapng \
   -o modified_mac.pcapng
This command replaces whatever the source and destination MAC addresses are with the provided values using using the --enet-smac and --enet-dmac flags. The -i and -o flags specify the input and output pcap file names.
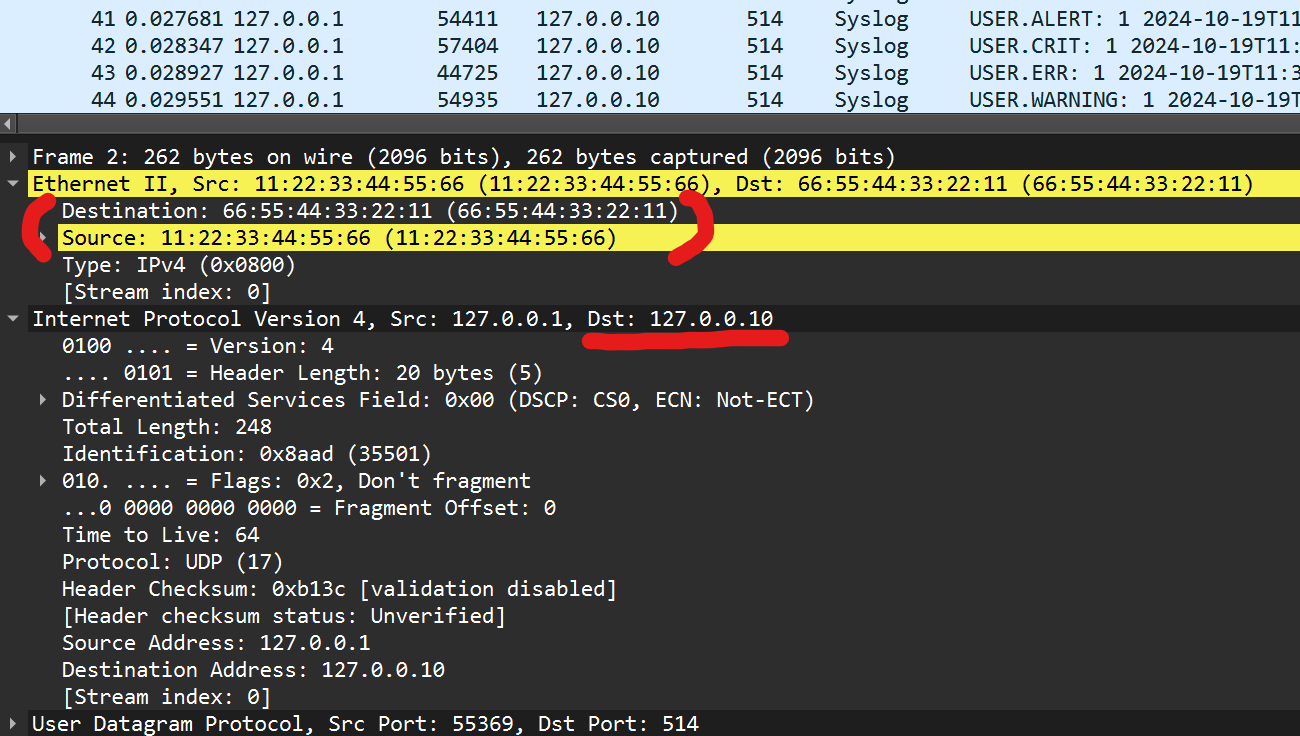
The source and destination IP addresses can be modified using the srcipmap and dstipmap flags:
tcprewrite \
   --srcipmap=127.0.0.1:127.0.0.10 \
   --dstipmap=127.0.0.1:127.0.0.10 \
   --fixcsum \
   -i modified_mac.pcapng \
   -o modified_ip.pcapng
This command changes the source and destination IPs from 127.0.0.1 to 127.0.0.10 and fixes the Internet layer checksum (--fixcsum), so that we are not left with erroneous packets.
If it is desired to randomize both source and destination IP addresses, omit the
srcipmapanddstipmapflags and instead use-s <n>where n is a seed number
The result should be similar to the image below:
Splendid!
The previous two steps (MAC and IP address modification) can be combined into a single command:
tcprewrite \
   --enet-smac=11:22:33:44:55:66 \
   --enet-dmac=66:55:44:33:22:11 \
   --srcipmap=127.0.0.1:127.0.0.10 \
   --dstipmap=127.0.0.1:127.0.0.10 \
   -C \
   -i normal.pcapng \
   -o modified_mac_and_ip.pcapng
The -C flag is a shorthand version of --fixcsum.
In case the port numbers need to change as well, you can slightly modify the command above to include the port mapping using the --portmap flag too:
tcprewrite \
   --enet-smac=11:22:33:44:55:66 \
   --enet-dmac=66:55:44:33:22:11 \
   --srcipmap=127.0.0.1:127.0.0.10 \
   --dstipmap=127.0.0.1:127.0.0.10 \
   --portmap=514:515 \
   -C \
   -i normal.pcapng \
   -o modified_mac_and_ip.pcapng
In order to remember the order of the input flags easier, read them like, change x from y to z.
These flags can take multiple values at the same time (separated by a comma) as well. For instance for port numbers:
--portmap=514:515,80:443
For reference,
man tcprewritehas an –enet-vlan section which demonstrates how to add, modify, or delete VLAN tags
Alright, we now need to look at the ways that we can replay packets into the network.
Replaying Packets Into The Network
The intention is to keep the replay traffic local to the machine we are on and avoid spamming the LAN or, even worse, the internet with spoofed packets. The other big benefit of this approach is that we do not need another machine or a VM for traffic replay to work.
However, simply changing the MAC and destination IP addresses to what is configured on a NIC on your machine and replaying the packet capture will not work. This is because of the way Tcpreplay injects packets between the TCP/IP stack and the NIC’s driver1.
This means we need to become creative!
Luckily, there are two easy and convenient ways to do this:
- The tc (traffic control) utility and its packet redirection capability
- or using network namespaces
The tc option might not work on all kernel versions (e.g. WSL) or some WLAN interfaces! If you are operating wirelessly and it does not work, only consider the network namespaces option.
Let’s explore these options.
Using TC for Packet Redirection
tc (traffic control) is a wonderful tool that is included in the iproute2 suite, enabling you to influence the network traffic in various ways, such as dropping, redirecting, and delaying packets to name a few.
We will leverage tc to redirect the egress/outgoing traffic from the eth0 interface to destination IP 10.20.30.40 and port 514 back to the loopback interface. This way, the replay traffic will not exit our machine and the rest of traffic will be unaffected. As depicted below:
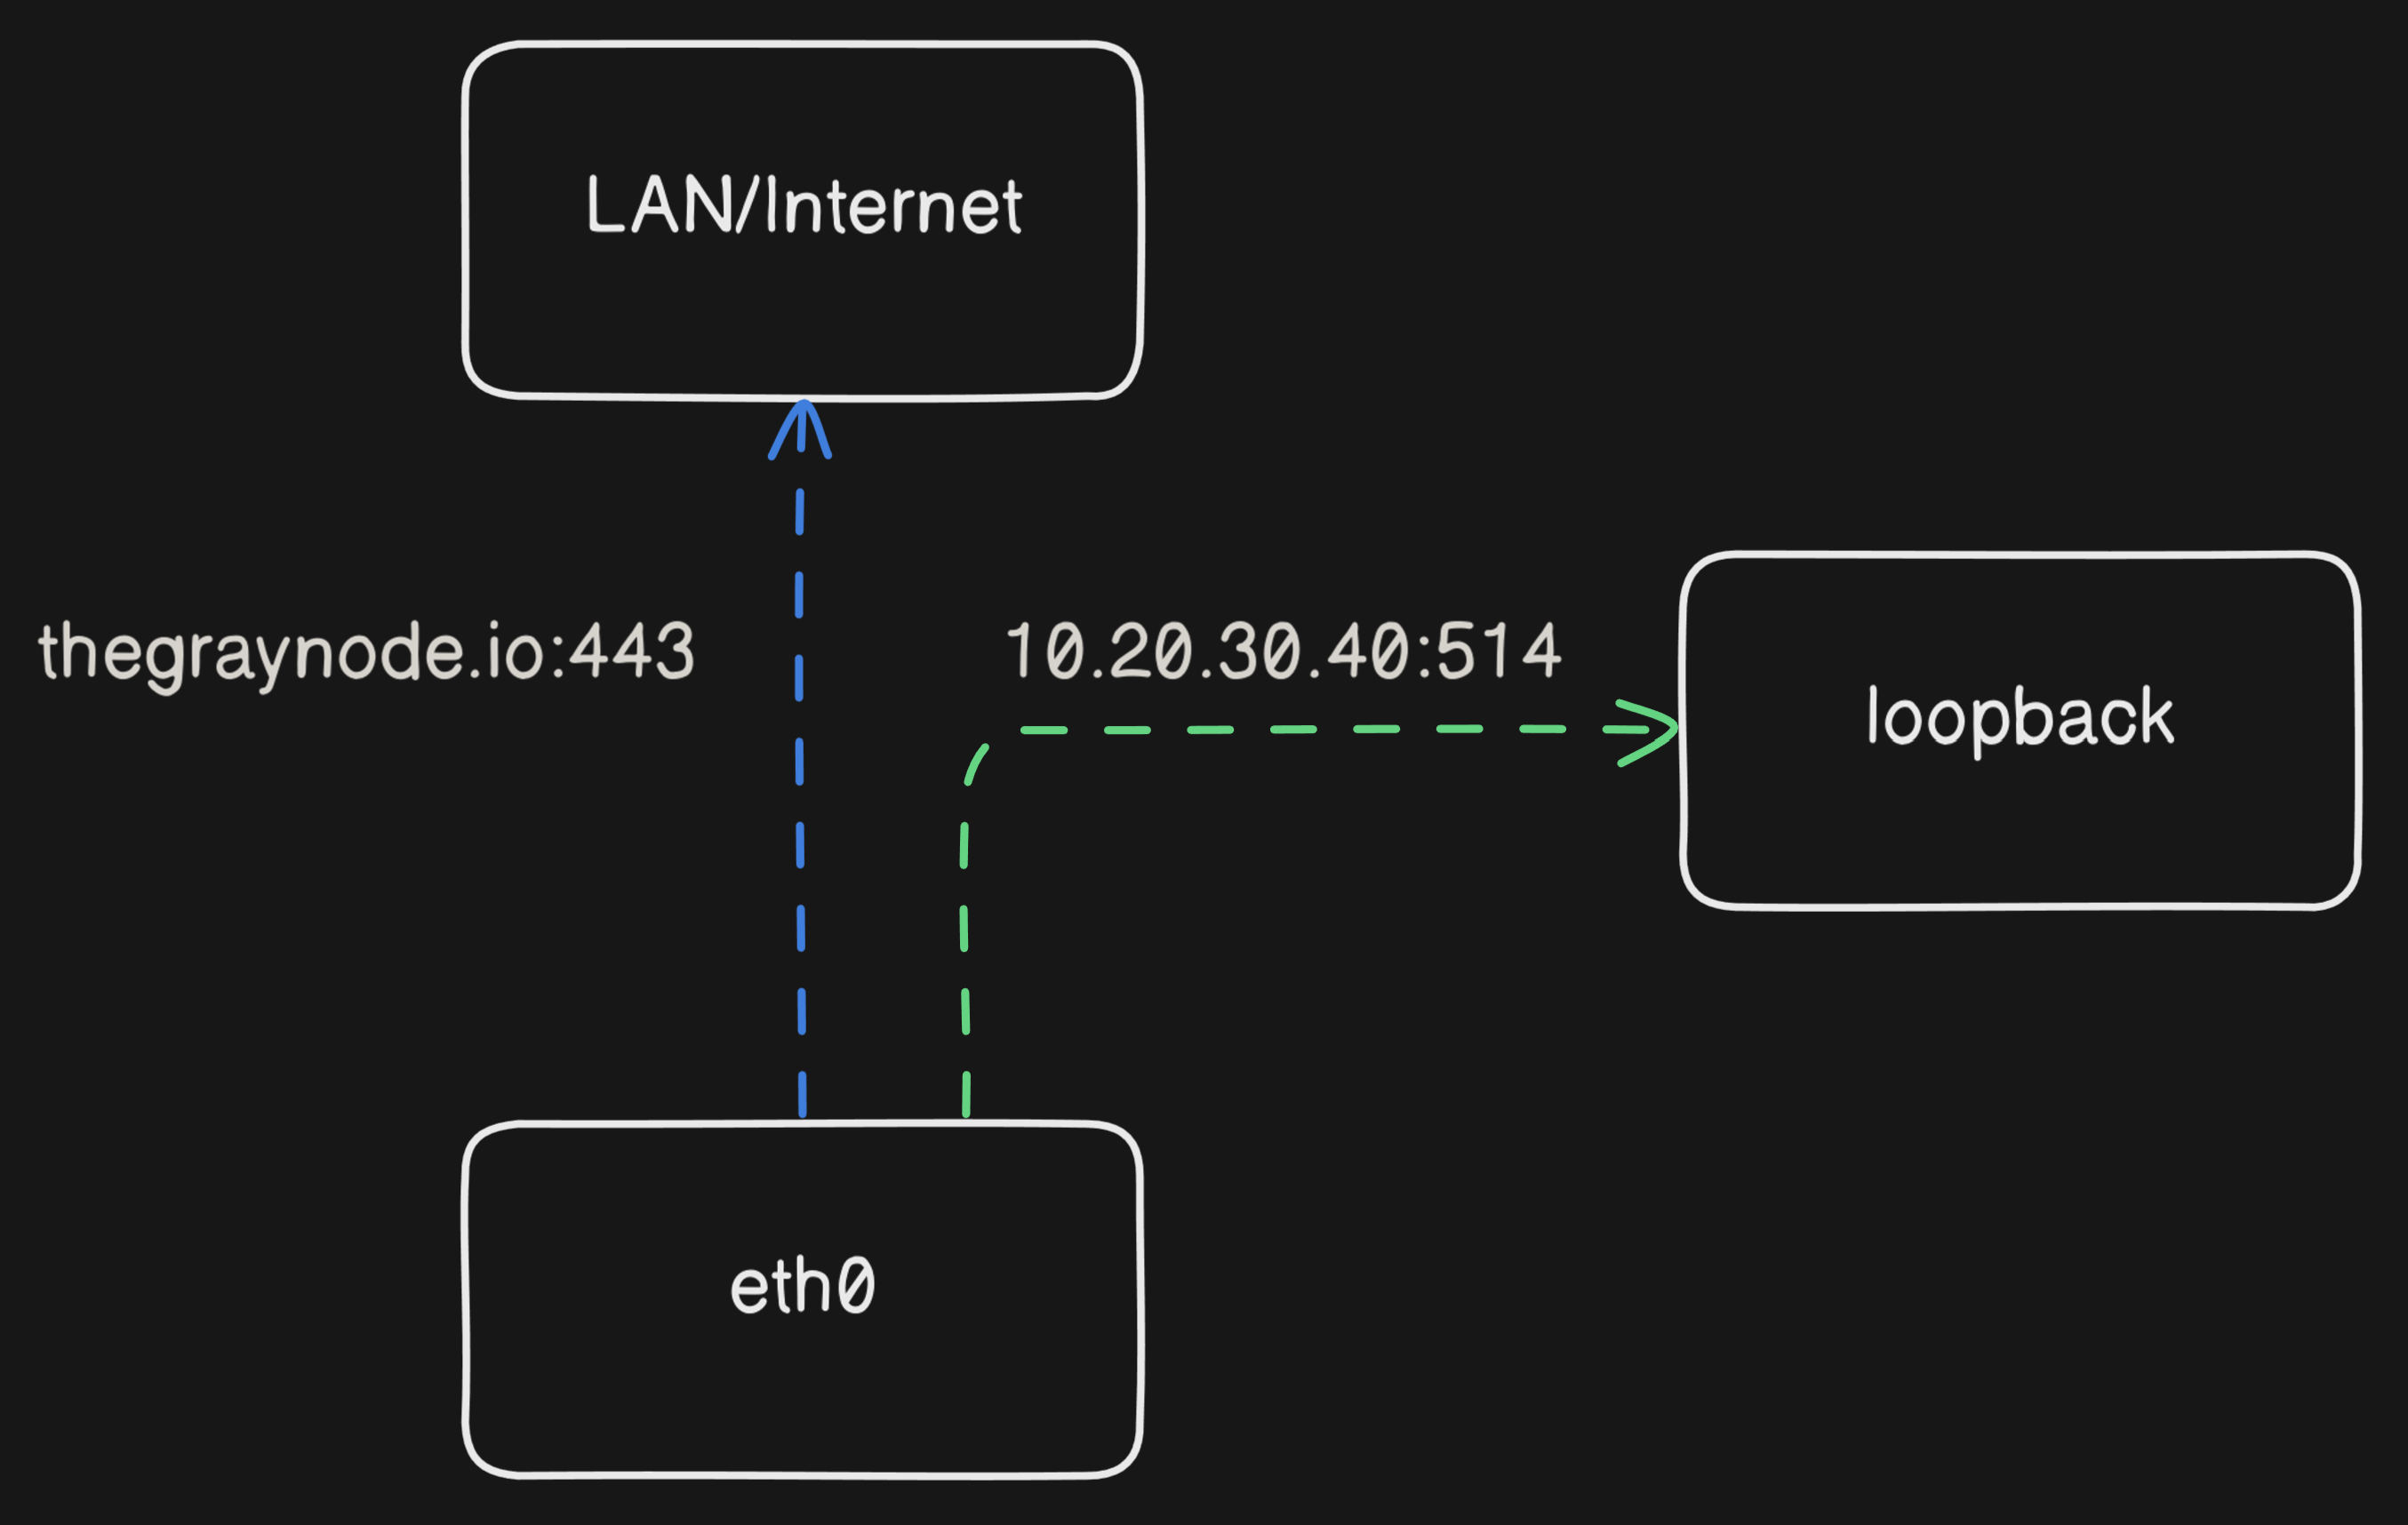
This way you can have another program that listens to that IP and port to receive these packets.
As mentioned earlier, tc’s traffic redirection requires your NIC or kernel to support it. For instance, on WSL, this is not an option unless you compile a custom kernel which is not the most desirable thing to do. Nevertheless, on most other machines, this is a very convenient choice and compiling a custom kernel is absolutely not necessary.
Since we are targeting the loopback interface, we need to zero-out the source and destination MAC addresses and then change the source and destination IP addresses from 127.0.0.10 to something arbitrary like 10.20.30.39 and 10.20.30.40, respectively.
tcprewrite \
   --enet-smac=00:00:00:00:00:00 \
   --enet-dmac=00:00:00:00:00:00 \
   --srcipmap=127.0.0.10:10.20.30.39 \
   --dstipmap=127.0.0.10:10.20.30.40 \
   -C \
   -i normal.pcapng \
   -o normal_zero_mac_dst_ip_10.20.30.40.pcapng
Then, we assign the destination IP address to the loopback interface:
sudo ip addr add 10.20.30.40/32 dev lo
Add a tc handle to eth0:
sudo tc qdisc add dev eth0 handle 1:0 root prio
And a tc policy to redirect egress/outgoing UDP traffic to 10.20.30.40 on port 514 back to the loopback interface.
sudo tc filter add dev eth0 parent 1:0 protocol ip prio 1 u32 \
  match ip dst 10.20.30.40 \
  match ip dport 514 0xffff \
  match ip protocol 17 0xff \
  action mirred egress redirect dev lo
These Hex values (
0xffffand0xff) tell the filter to exactly match all 16 bits of the port number and 8 bits of the protocol field respectively. The protocol number 17 is assigned to UDP.
Before replaying the packets, open another terminal and run either:
- tcpdump:
sudo tcpdump -i lo host 10.20.30.40 and port 514 - or nc:
sudo nc -nukl 10.20.30.40 514
In order to be able to observe the packets as the traffic is being replayed.
Finally, replay the traffic using Tcpreplay:
sudo tcpreplay -t -i eth0 normal_zero_mac_dst_ip_10.20.30.40.pcapng
# The below command will have the same effect too
sudo tcpreplay -t -i lo normal_zero_mac_dst_ip_10.20.30.40.pcapng
The -t flag tells Tcpreplay to replay the packets immediately. Omitting it will replay the packets with the speed and timing they were captured.
The -i flag specifies the interface name followed by the pcap file name.
Clean up
You can remove the custom IP address from the loopback interface as well as the tc filter and handle using the commands below.
sudo ip addr del 10.20.30.40/32 dev lo
sudo tc filter del dev eth0 parent 1:0
sudo tc qdisc del dev eth0 handle 1:0 root prio
Using Network Namespaces
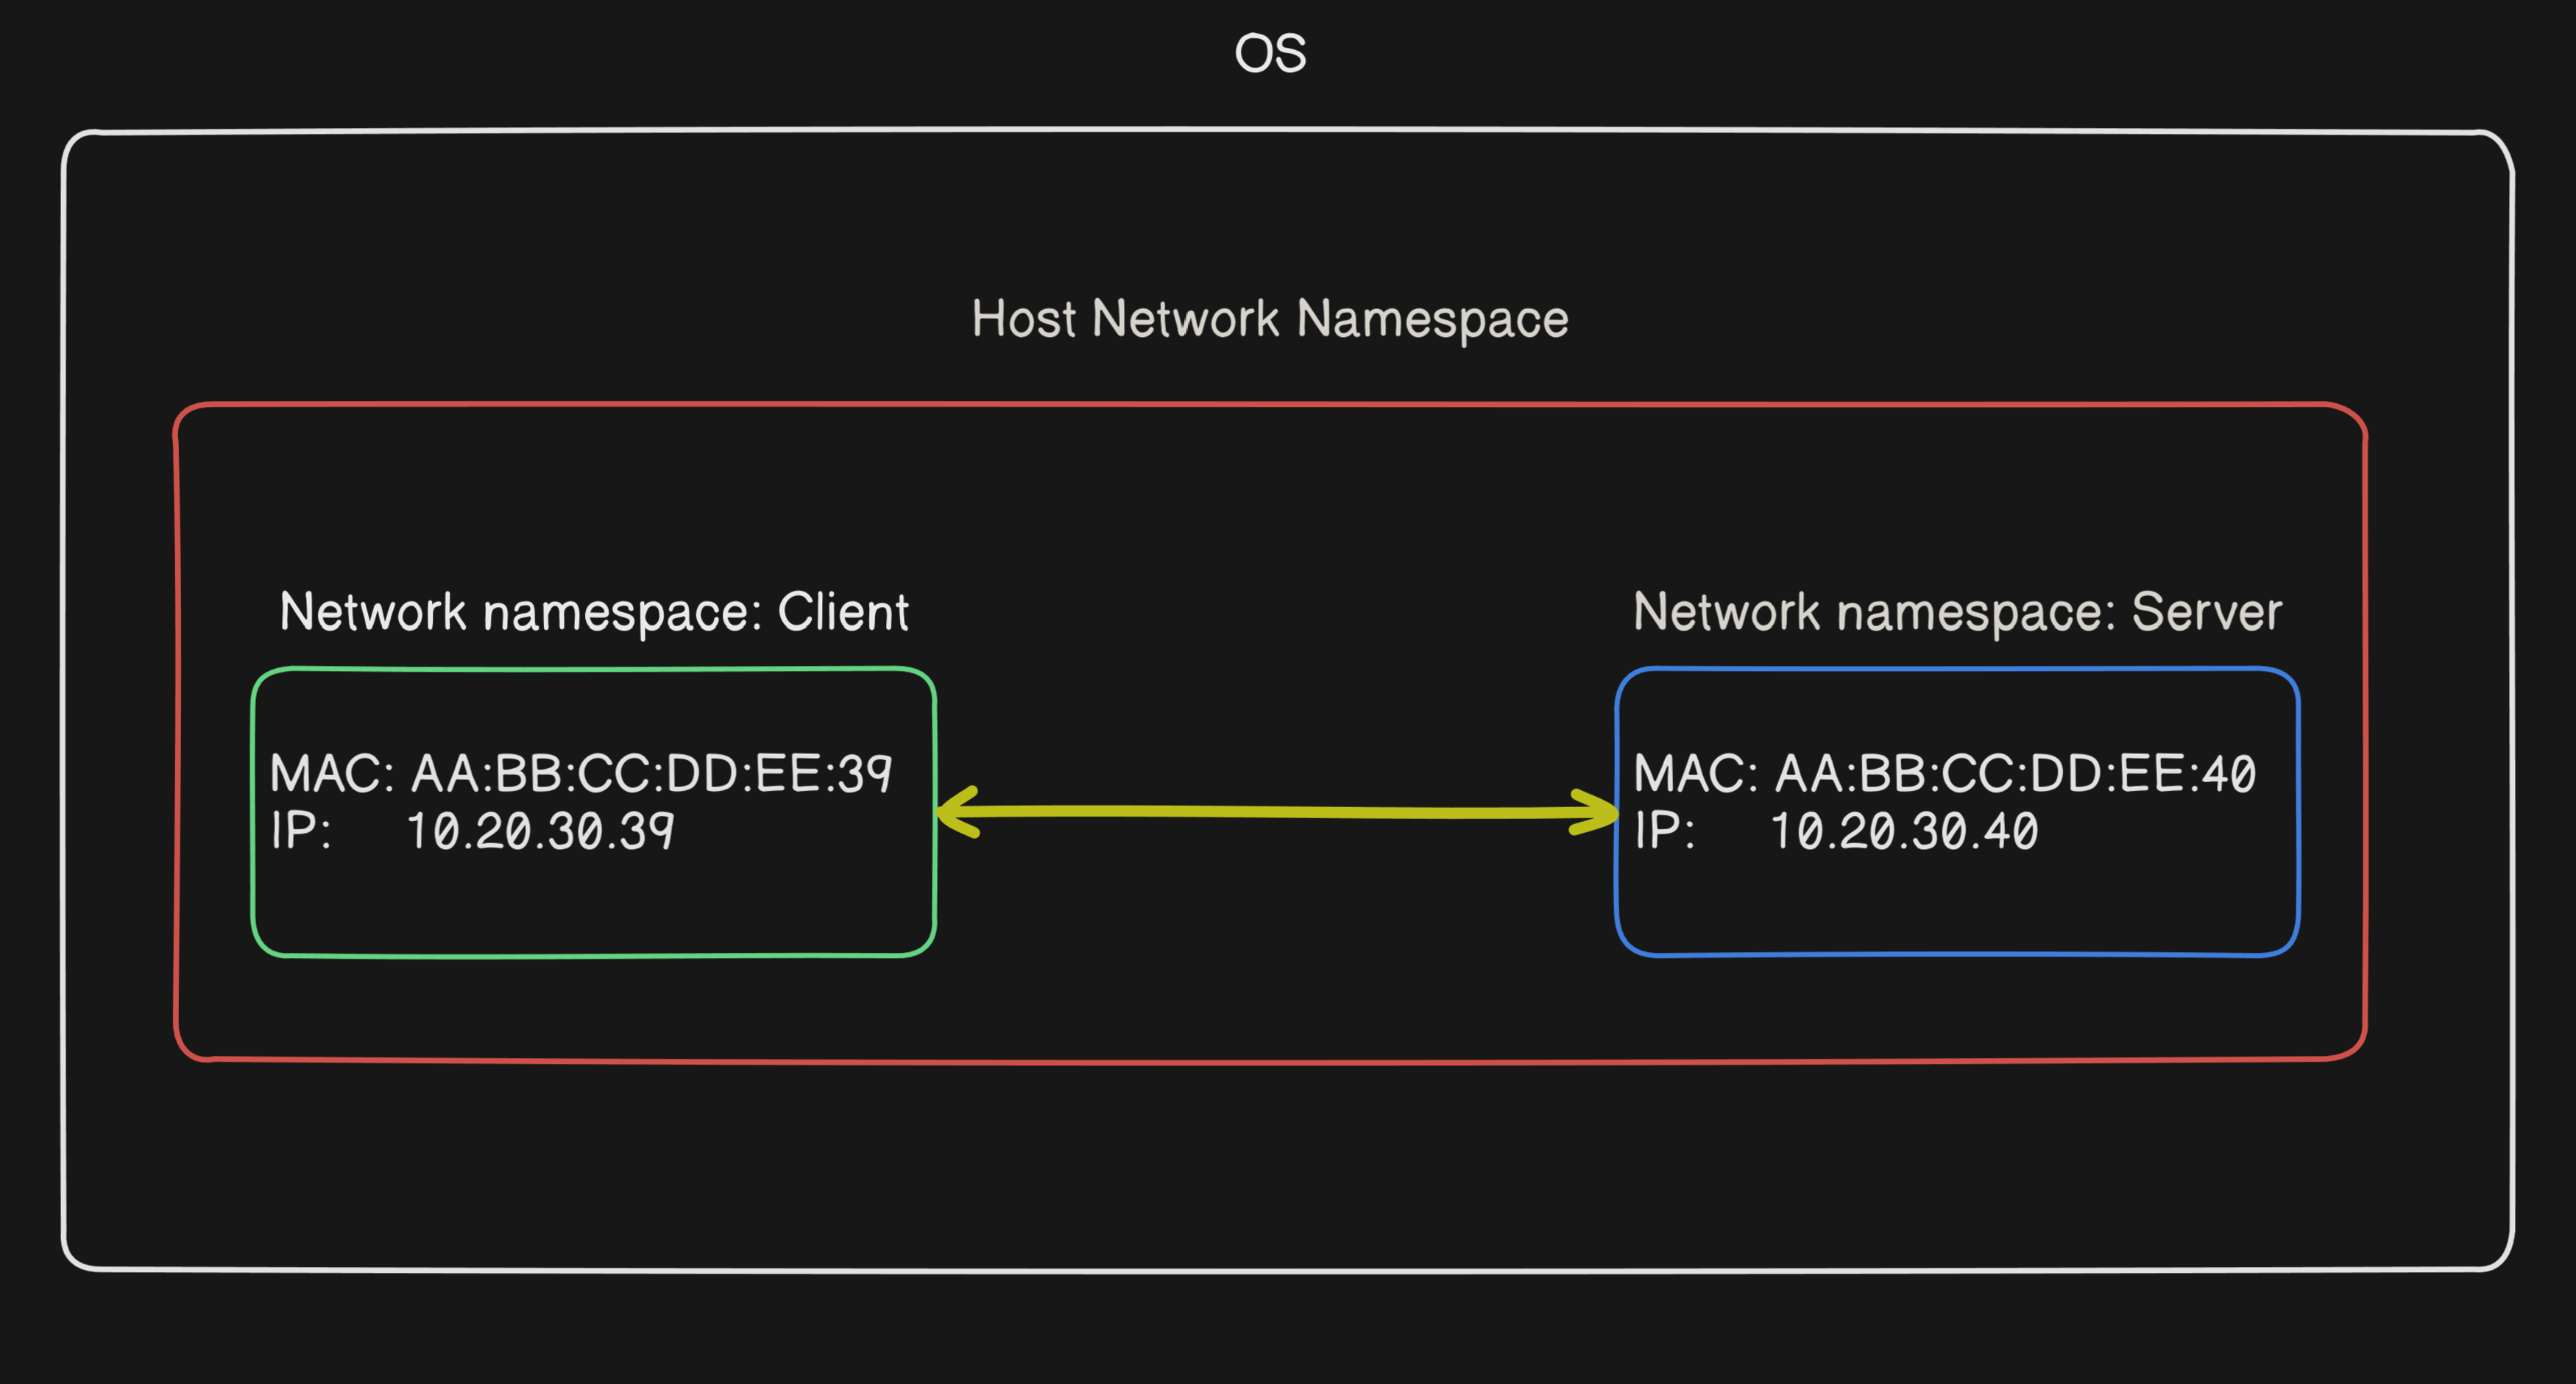
network namespaces are a great way to separate system’s network resources. Putting a process into a network namespace will lead to it having its own restricted view of what the network environment looks like. i.e. it won’t see the host machine’s main network interfaces by default.
This is how containers define restricted and isolated networks; however, rest assured, we are not dealing with containers in this post.
The plan is to create two network namespaces named client and server, with our intended MAC and IP addresses, connect them through a point-to-point link, and send traffic from the client to the server. Exactly like directly connecting two computers with an Ethernet cable.
In order to make things simpler to follow, let’s agree on the MAC and IP addresses that we would set and utilize in our network namespace:
- Client MAC address: AA:BB:CC:DD:EE:39
- Client IP address: 10.20.30.39
- Server MAC address: AA:BB:CC:DD:EE:40
- Server IP address: 10.20.30.40
- Source and destination ports do not need to be modified
If you do not change the source IP address, you might end up with packet drops due to Reverse Path Filtering that are seen through the SKB_DROP_REASON_IP_RPFILTER log. I hinted at this here but wanted to repeat it in case it was missed. There are two options, disabling reverse path filtering or changing the source IP address.
Here is a diagram for more clarity:
We kick-off by creating the network namespaces:
sudo ip netns add client
sudo ip netns add server
Then, create a point-to-point link and specify the other end:
sudo ip link add veth39 type veth peer name veth40
The
veth39will be for the client, andveth40will be the server’s. Following their MAC and IP format.
Next, attach each virtual Ethernet or veth to its respective network namespace:
sudo ip link set veth39 netns client
sudo ip link set veth40 netns server
Assign the MAC and IP addresses:
sudo ip -n client addr add 10.20.30.39/24 dev veth39
sudo ip -n client link set dev veth39 address AA:BB:CC:DD:EE:39

sudo ip -n server addr add 10.20.30.40/24 dev veth40
sudo ip -n server link set dev veth40 address AA:BB:CC:DD:EE:40
The
ip netnsandip -ncommands can be used interchangeably
Bring up the virtual and loopback interfaces in each namespace:
sudo ip -n client link set veth39 up
sudo ip -n client link set lo up

sudo ip -n server link set veth40 up
sudo ip -n server link set lo up
Conduct a connectivity test to ensure everything is configured properly:
sudo ip netns exec client ping -c 1 10.20.30.40
sudo ip netns exec server ping -c 1 10.20.30.39
Here are some more useful verification commands should you need them:
sudo ip netns exec client ip addr       # Shows the MAC and IP addresses
sudo ip netns exec client ip neighbor   # Shows ARP entries
sudo ip netns exec client ip route show # Shows routes

sudo ip netns exec server ip addr
sudo ip netns exec server ip neighbor
sudo ip netns exec server ip route show
Modify the packet capture to correspond to the MAC and IP address of our vnets:
tcprewrite \
   --enet-smac=AA:BB:CC:DD:EE:39 \
   --enet-dmac=AA:BB:CC:DD:EE:40 \
   --srcipmap=127.0.0.10:10.20.30.39 \
   --dstipmap=127.0.0.10:10.20.30.40 \
   -C \
   -i normal.pcapng \
   -o normal_src_ip_10.20.30.39_dst_ip_10.20.30.40.pcapng
Similar to the tc method, if you want to see the traffic as it is being replayed in the next step, on another terminal you can run nc (or any other command) in a specific namespace.
In this case, we are expecting traffic in the server namespace:
sudo ip netns exec server nc -nukl 10.20.30.40 514
Replay the traffic in the client network namespace:
sudo ip netns exec client \
   tcpreplay \
   -t \
   -i veth39 \
   normal_src_ip_10.20.30.39_dst_ip_10.20.30.40.pcapng
If you have followed the steps as described, you should have seen the packets flow in your terminal running nc.
Clean up
Cleaning up everything we did in this section is pretty simple. We just need to delete the namespaces we have created and the rest are taken care of:
sudo ip netns del client
sudo ip netns del server
Summary
In this article we learned about generating random syslog messages, cooked and normal pcap/pcapng files, modifying packet captures using Tcprewrite and replaying them back local to our machine by Tcpreplay with the help of tc traffic redirection and network namespaces.
Feel free to reach out to me if you would like to see more articles like this or have suggestions or questions.
I hope you found this post useful and informative.
References
- Logger command in Linux
- Cooked or SLL packet captures - Wireshark Wiki
- TC’s u32 classifier
- TC’s u32 filter man-page
- TC classifying packets with filters
- Tcprewrite wiki